Data Maintenance
In daily activity, records of various types accumulate. The accumulation of too much data will fill up the database. The Purge Data window allows you to purge old records from the database, either manually or scheduled. Please remember to back up your data before performing a purge.
To open the Purge Data window, select Data Maintenance from the System Services button on the
Navigator or the Navbar.
Five standard buttons are displayed in the Purge Data window as well as in others throughout Panorama. These icons are seen in windows where editing capabilities exist. The icons are:
New Record
± Creates a new, blank record. Type in the new name, click OK, then follow the instructions in the yellow box to specify the frequency of the purge.Save
± Saves all changes to the database.Clone
± Makes a copy of the current record, under a new name. Type the new name, then click OK.Delete
± Deletes the current record. Panorama asks if you are sure. Click OK to delete the record or Cancel to return to the record.Help
± Launches PanoramaĒs on-line help.
In addition to the standard buttons, the Purge Data window has two buttons specific to the purpose of the window:
SQL
± Shows the SQL database script that will be used to run the purge.Go
± Manual start a manual or automatic purge.
To create a new automatic purge schedule:
1. Click the New button.
2. The sequence of windows that follow goes step-by-step to determine the what records will be effected and how often the action(s) will be performed. The Notes in the yellow background area describe what the results will be with the currently selected item. Select one of the radio buttons to specify the frequency of that this particular purge will have:
No Frequency only runs manually. Click Finish, then proceed to step 4. To run this report in the future, click the Go button.
Hourly purges records every x number of hours, at y minutes past the hour. Specify x in the Number of Hours Between Purges field; specify y in the Starting Minute field. Click Next.
Daily purges records once per day, at the time entered in the Time To Run field. Click Next.
Weekly purges records on selected days, either at the same time on each selected day, or at a time specific to each selected day. Click the checkbox in front of each day of the week this purge should run. If the purge is to run at the same time on all selected days, check the Use Default Time for All Days field, then enter the time the purge should run. If the purge will run at a different time on any of the selected days, uncheck the Use Default Time for All Days checkbox, then enter the time after each selected day of the week. The yellow description box lists all of the specified times. Click Next.
Monthly purges records once a month, on the selected day of the month, and at a specified time. Select a number from the Day to Run field, or click the Last Day of the Month checkbox. Set a time in the Time field. Click Next
3. Select one of the following from the Date Range field: All Dates, Fix # of Days Back, or Fix # of Months Back. If All Dates was selected, all records will be purged, no matter how old or new they are. If Fix # of Days Back or Fix # of Months Back was selected, select a number of days or months back. When the purge runs, it will use the current date, go back the number of days or months specified, then erase everything OLDER than that date. An example date is shown in the Sample Start Date and Time; this is only an example, the purge will not run at this time. Click Finish.
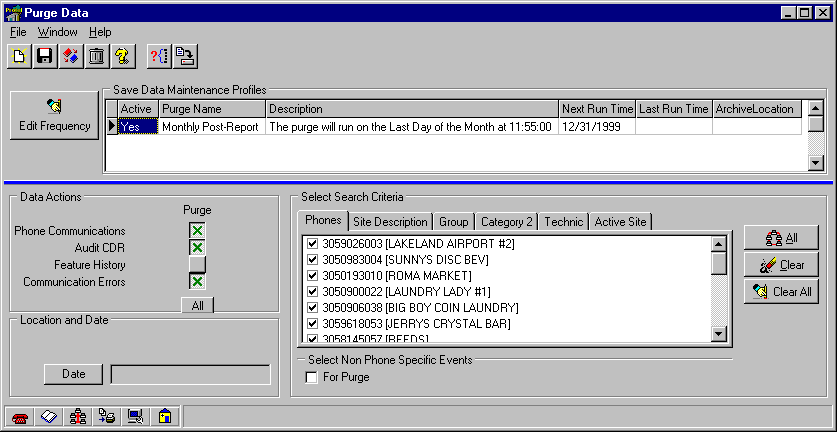
4. In the Data Actions section, select the types of records that to be purged. Click All to select all record types. If all are selected, the same button reads None, and clicking it will unselect all of the record types.
5. Select which phone records should be included in this profile. The phone records can be selected by Phone number,
Location Name/Description field , or the four User Definable Categories. Click All to select all the records in the current tab, Clear to deselect all the records in the current tab, or Clear All to deselect all the records in all the tabs.6. Click in the Select Non Phone Specific Events For Purge checkbox below the set of tabs to include for purging the data that is not specific to any one particular phone. An example of this kind of data would be database communication errors.
7. Click Save.
Any purge can be run manually by selecting it from the list and clicking the Go button.
Please remember to back up your data before performing a purge.