Route Records
Route Records are sets of specific instructions that enable the phone to send different types of calls through different carriers, to perform dial correction procedures, and to reroute calls with a busy signal or no answer.
To open the Route window, click on the
Configuration button in either the Navigator or the Navbar and select Route Records from the pull-down menu that appears.
Five standard buttons are displayed in this window as well as in others throughout Panorama. These buttons are seen in windows where editing capabilities exist. The buttons are:
New Record ń Creates a new, blank record.
Save ń Saves all changes to the database.
Clone ń Makes a copy of the current record.
Delete ń Deletes the current record.
Help
ń Launches Panoramaís on-line help.
The other buttons, which are specific to the Route window, are:
Change to Advanced Editing ń Changes a record created in Simple Editing mode to use Advanced Editing.
Edit Auth Code Library ń Opens the Auth Code Library window, where authorization numbers are entered and named.
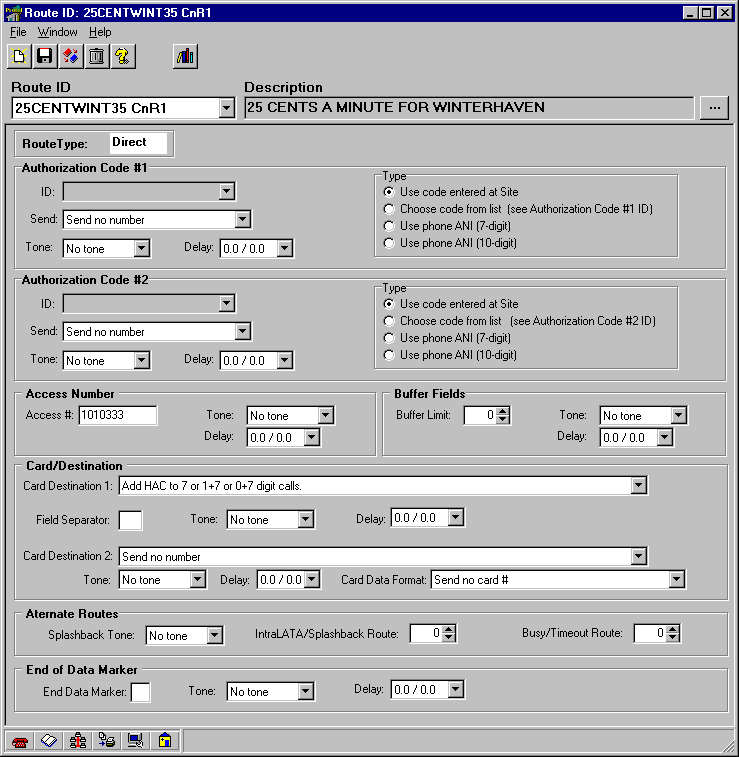
The Route window (in Advanced Editing mode*) is divided into sections:
Route Type
ń The route is either a Direct Route or a Card Route. This is used for classification purposes and does not effect the record otherwise.
Authorization Code #1 / Authorization Code #2
ń First, determine the Type of authorization code needed from the radio button list. If the code is the phoneís number, select to use seven digits or ten. If not, either select to use a code thatís entered from the phoneís keypad or select a code from the ID pop-down menu. The authorization codes can be found and created in the Edit Auth Code Library window. Next, in the Send: pull-down menu, determine when the authorization code should be sent. If the carrier uses a tone to indicate that it is ready for the authorization code, specify what tone is used in the Tone: pull-down menu. And finally, in the Delay: field, set the amount of time the phone should wait for the tone and the amount of time the phone should wait after the tone is detected before sending the authorization code.
Access Number
ń Enter the number the phone should dial to use the carrier desired. If the carrier uses a tone to indicate that it is ready for an authorization code or a phone number, specify what tone is used in the Tone: pull-down menu. In the Delay: field, set the amount of time the phone should wait for the tone and the amount of time the phone should wait after the tone is detected before sending the remaining numbers.
Card/Destination
ń Select from the pull-down menu how the numbers should be sent, whether credit card or destination numbers. If the carrier uses a tone to indicate that it is ready for a card number or a phone number, specify what tone is used in the Tone pull-down menu. Set the Delay field for the amount of time the phone should wait for the tone or the amount of time the phone should wait if it is not waiting for a tone before sending the remaining numbers.
Alternate Route
ń If the carrier cannot process a call, or the payphone user tells an operator that he wants to use a different carrier, it will return a Splashback Tone. Specify the splashback Tone in the pull-down menu; also specify an Alternate Splash Route to use in this event. Select a route to use if the carrier returns a busy signal in the Alternate Busy Route field. When using Lata Screening, the Alternate Splash Route is used to redirect the payphone to use a different route. Lata Screening screens dialed numbers for calls that are going to the sama Lata. Typically, this is used for calls that should go through the LEC (Local Exchange Carrier). When screening a call in this way, the payphone first looks in the Lata Screening column in the Cost record. If there is a Yes for the band that the dialed number falls in, the payphone next looks in the Call Processing information. If the Lata Screening column here is also set to Yes for the Call Type, then the phone looks at the Route that was determined to be used for this call, and instead uses the route specified in the Alternate Splash Route box. The number in this box is looked up in the Route Assignments window, and that route is used instead. If either the Cost or the Call Processing windows has a No in the Lata Screening column, the call will be placed normally, using the route found in the Call Processing window (or the Cost window, if you have not yet Condensed Call Processing and Route Records).
End of Data Marker
ń The End of Data Marker is used to tell the carrier that the Card Destination 2 is complete so that the carrier can begin processing the call. If one is needed, specify what tone to send in the End of Data Marker field. If the carrier uses a tone to indicate that it is ready for the phone number, specify what tone is used in the Tone pull-down menu. From the Delay pull-down menu, select the time to wait for the end-of-data marker, or if No Tone was selected, how long to pause before sending.
Please refer to the Help topic
Condense Call Processing and Route Records for detailed instructions on cleaning up records after importing them from ExpressNet.
![]() In Simple Editing mode, only the Route Type, Access Number, and Destination Number are shown, and the Destination Number has only one pull-down menu.
In Simple Editing mode, only the Route Type, Access Number, and Destination Number are shown, and the Destination Number has only one pull-down menu.
