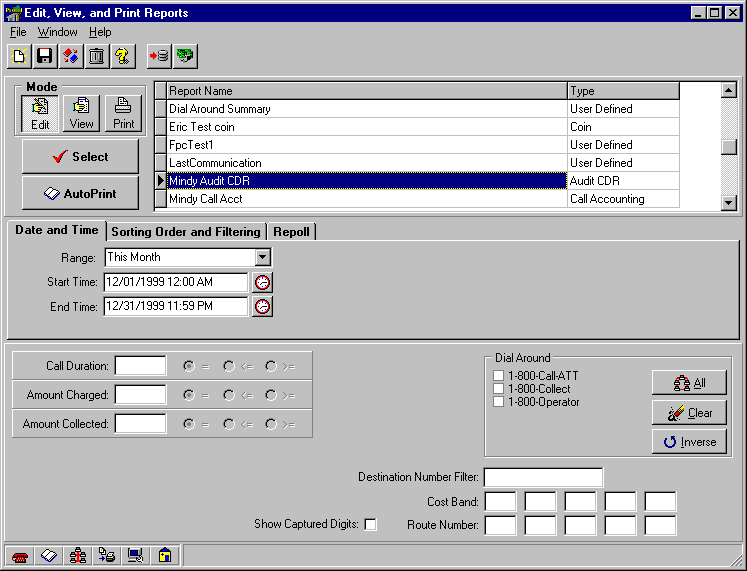
Reports
Panorama has incorporated many of the most popular and often requested reports as pre-configured reports. Any report can be modified within the report generator to suit more specific needs; new report formats can be created and used in Panorama by using the database language SQL.

To open the Edit, View, and Print Reports window, click the Reports button in the
Navigator or Navbar.
Five standard icons are displayed in this window as well as in others throughout Panorama. These buttons are seen in windows where editing capabilities exist. The buttons are:
New Record ñ Creates a new, blank record.
Save ñ Saves all changes to the database.
Clone ñ Makes a copy of the current record.
Delete ñ Deletes the current record.
Help
ñ Launches Panoramaís on-line help.
The other buttons, which are specific to the Reports window, are:
Import Report ñ Import a User-Defined report file.
Amount Collection ñ Create a report of coin box collections.
The Edit, View, and Print Reports window operates in three Modes:
Edit
ñ Open and modify an existing report.View
ñ Generate the selected report and view the results in a window.
To generate a report:
1. Select one of the reports from the list of reports by clicking on it once with the mouse pointer.
2. Select a Mode by clicking on one of the three buttons: Edit, View, or Print.
3. Set the date and time range in the Date and Time tab (shown in picture above). This can be done by either selecting a typical, preset Range from the pull-down menu or by setting a Start Time and End Time.
4. Select the fields and the direction (ascending or descending) that the records should be sorted by in the Sorting Order and Filtering tab. Also, click the Filters button to select phones for this report. Phones can be selected by any of the four
User-Defined Categories and by phone number. Phones not selected by either the phone number or a category will not be included. The only exception to this is if there are no filters selected. When this is the case, all phones are included. Click Clear to uncheck all checkboxes in the current tab or Clear All to uncheck all checkboxes under all tabs. If there are any filters chosen, a yellow light bulb icon will appear to the left of the filters button.

5. In the Repoll tab, choose whether or not to Poll the phones returned by the report. If so, set the time to poll the phones or select the radio button to Add Phones to Repoll List (See
Repoll Phones for a description). Also, check which polling actions to perform during this poll. (See Polling Actions List for a description)

Much of the lower window will change depending on the report selected from the list. Below are some features that will be common in most or all of the report types.
6. Select the Page layout. Portrait is the standard printed page; Landscape uses the paper lengthwise.
7. Choose a font size, measured in points.
8. Check the checkboxes next to the fields to be included in the report. Change the order of the fields by selecting the field (highlight the field name) and clicking the up or down arrows.
9. If
Status Flags will be used, select which ones to include in the report.10. Click Save.
11. Click the Edit, View, or Print button, then click Select to generate the report.
The Layout percentage and progress bar indicate how much of the page will be used with the current selections.
For more detailed information, see the topics for each type of report:
Audit CDR Reports
Coin Reports
Phone Configuration Reports
Trouble Reports
Coin Collection Reports
External report writers can be used by accessing the database tables that Panorama uses. DO NOT ALTER THESE TABLES IN ANY WAY! Read from the tables, but do not write to them. Refer to the brief
Database Table Descriptions to learn where to find the information needed.